

【Important Notes】
- The article shows a part of recommended set ups for Salesforce Community Auto Translator. Please take a look for “Access Control Settings of Salesforce Community Auto Translation ” for the whole procedure.
- This article is an example for settings which we recommend. Please set up on your responsibility in consideration of the security and access control you require.
- Please note that we shall not be responsible for the setting of your organization’s access control and its result,any loss, damages and troubles.
【Setting procedures】
<<Settings>>
Set as the followings
- Organization-Wide Defaults
- Sharing Rules for the objects below
- CA Chatter Auto Translator Log Counter Sharing Rules
- CA Chatter Auto Translator Settings Sharing Rules
<<Settings Procedure>>
- Organization-Wide Defaults
- The Image below shows the window when you go to Setup > Administer > Security Controls > Sharing Settings.
Please press “Edit” button in the section Organization-Wide Defaults, Default Sharing Settings.

- Set all of the “Default External Access” as “Private” as in the object below. Press “ Save ” after setting.

- Sharing Rules 「CA Chatter Auto Translator Log Counter Sharing Rules」
- Press “New” in the section, “CA Chatter Auto Translator Log Counter Sharing Rules” in Sharing Rules Section.

- Type as below.
- You can type any name for “Label” in “Step 1: Rule Name”.
- You can type any name for “Rule Name” in “Step 1: Rule Name”.
- Select “Based on criteria” as the “Rule Type” in “Step 2: Select your rule type”.
- After choosing “Criteria” in “Step 3: Select which records to be shared”.
- Type “1” for the “Value” after choosing “Translator Log Counter Name” in “Field”, and “Not Equal to” for “Operator”.
- “Step 4: Select the users to share with“ should be chosen following the guidance of the access control of your organization. It is necessary to create the settings of the sharing rules for each groups. In this sample, “Public Groups” is chosen as the sharing groups and set up for “All Partner Users”
- Step 5: Access Level shold be set as “Read / Write” in the section, “Select the level of access for the users”.
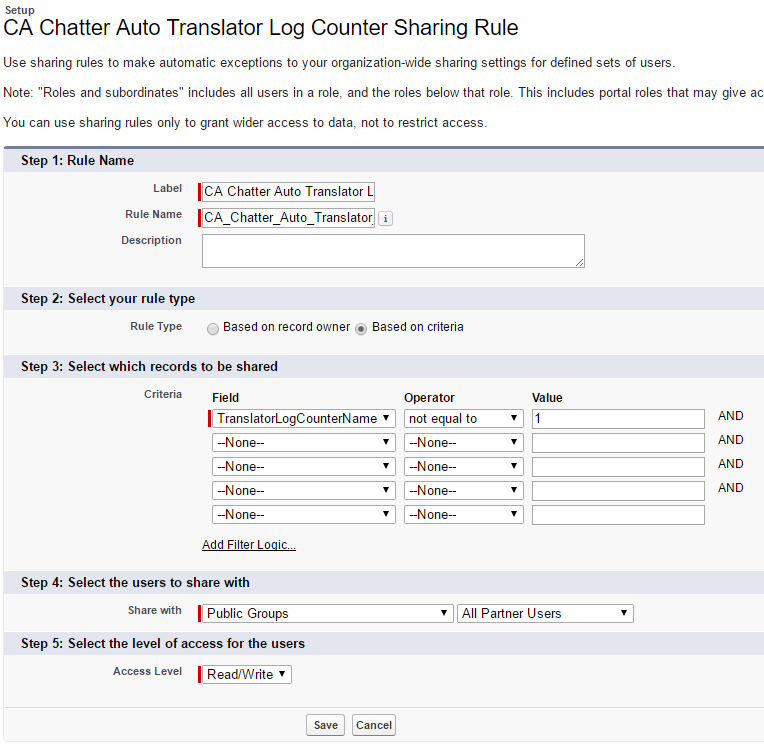
- Press “Save” button.
- The sample above is the external community users’ “Partner Users” page. If there are “Customer Portal Users” as the external community users, change “Partner Users” into “Customer Portal Users” and make the guidelines for sharing.
- CA Chatter Auto Translator Settings Sharing Rules
- Press “New” in the section “CA Chatter Auto Translator Settings Sharing Rules”, “Sharing Rules”.

- Enter as below
- For ”Label” in ”Step 1: Rule Name,” type any name of the label.
- For “Rule Name” in “Step 1: Rule Name,” type any name of the rule name.
- Choose “Based on criteria” for the “Rule Type,” “Step 2: Select your rule type” .
- In Step 3: Select which records to be shared, for Criteria
- In “Field,” “SettingName” should be chosen, and in “Operator,” “not equal to” should be chosen. And, enter “1” as the “Value”.
- ”In Step 4: Select the users to share with,,” you have to choose the groups following the access control policy of your organization. You have to create the sharing rules for each community when you share with groups more than one. In this sample, choosing “Public Groups” to share, and set up with the “All Partner Users.“.
- Step 5; Select the level of access for the users. Choose “Read Only” for the “Access Level”.
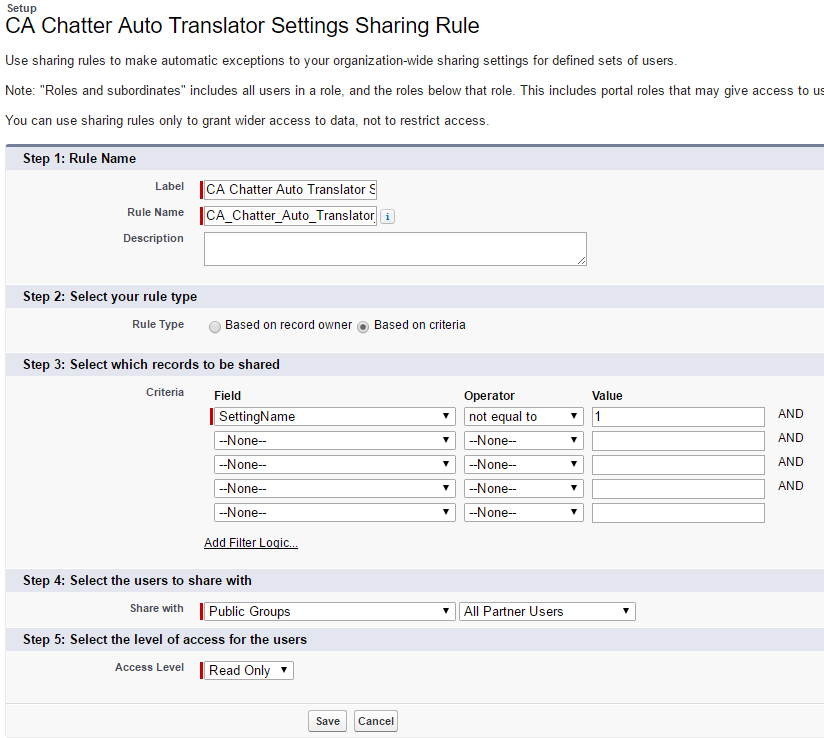
- Press “Save”.
- The sample above is for “the Partner Users” as an external users in the community.
If there is “Customer Portal Users” in your Community external users, you can choose “Customer Portal Users” instead of “Partner Users” to make the sharing rules.
Last Update: 2023年10月26日